
Having the close tools to visualize your institution information is cardinal to occurrence successful the modern satellite of business. Jack Wallen shows you however to deploy an Elasticsearch clump to service arsenic your foundation.

Image: Profit_Image/Shutterstock
Elasticsearch is simply a precise almighty hunt and investigation motor that tin standard highly well. With this tool, you person the instauration for visualizing monolithic amounts of data. But erstwhile you commencement to standard Elasticsearch to conscionable the demands of large data, you're going to privation to employment much than 1 server. When you commencement to standard up to conscionable endeavor demands, a azygous server would choke connected that magnitude of data.
So, what bash you do? You deploy a clump of Elasticsearch servers. I'm going to amusement you however to bash conscionable that. When you're finished, you'll person the indispensable powerfulness to commencement gathering unthinkable information visualization tools, susceptible of handling monolithic amounts of data.
SEE: Snowflake information warehouse platform: A cheat expanse (free PDF) (TechRepublic)
What you'll need
I'm going to show this connected 2 instances of Ubuntu Server 20.04, but you tin rotation it retired to arsenic ample a clump arsenic you need. Besides the 2 instances of Ubuntu Server, you'll besides request a idiosyncratic with sudo privileges. That's it. Let's deploy.
How to instal Java
You're going to request astatine slightest Java 8 installed connected each server, truthful we're going to instal the default JRE with the command:
sudo apt-get instal default-jre -yOnce that's installed connected some of our trial machines, we tin past instal Elasticsearch.
How to instal Elasticsearch
This has to beryllium done connected some machines. First, instal the Elasticsearch GPG key:
wget -qO - https://artifacts.elastic.co/GPG-KEY-elasticsearch | sudo apt-key adhd -Next, instal apt-transport-https with:
sudo apt-get instal apt-transport-httpsAdd the indispensable repository with the command:
echo "deb https://artifacts.elastic.co/packages/6.x/apt unchangeable main" | sudo tee -a /etc/apt/sources.list.d/elastic-6.x.listFinally, update apt and instal Elasticsearch:
sudo apt-get update sudo apt-get instal elasticsearch -yStart and alteration Elasticsearch:
sudo systemctl commencement elasticsearch sudo systemctl alteration elasticsearchHow to configure Elasticsearch
You'll bash this connected some servers, conscionable marque definite to change the configuration to acceptable each machine. We'll telephone the archetypal instrumentality controller-1 and the 2nd instrumentality node-1. Open the configuration record with the command:
sudo nano /etc/elasticsearch/elasticsearch.ymlIn that file, you'll privation to edit the pursuing lines. Some of these lines volition beryllium commented out, truthful you'll request to region the starring # quality first. The lines to beryllium edited are (everything successful bold should beryllium edited arsenic needed):
- cluster.name: elkcluster
- node.name: "controller-1"
- network.host: 192.168.1.80
- http.port: 9200
- discovery.zen.ping.unicast.hosts: ["192.168.1.80", "192.168.1.81"]
In my case, the controller is connected 192.168.1.80 and the node is connected 192.168.1.81.
Save and adjacent the file. Restart Elasticsearch connected some machines:
sudo systemctl restart elasticsearchHow to trial the cluster
You'll request to springiness Elasticsearch a fewer minutes to travel up. You tin trial it with the command:
curl -XGET 'http://192.168.1.80:9200/_cluster/state?pretty'Make definite to edit the IP code supra to either your controller oregon node. If you're investigating the controller, usage the controller IP, and if you're investigating the node, usage the node IP.
When Elasticsearch is yet running, you should spot rather a batch of output that includes:
{ "cluster_name" : "monkeypantz", "cluster_uuid" : "rGzNNmm_Rteel0Xg3xqw9w", "version" : 6, "state_uuid" : "WVx5O6Q7SfOqZf_wxaPOKQ", "master_node" : "2NI9_pDYS1WvJYQz-XY3KQ", "blocks" : { }, "nodes" : { "yV2TBoxVTvKbh7E1ZngpbA" : { "name" : "node-1", "ephemeral_id" : "pkb3vapLTd2yFLrXO64ENA", "transport_address" : "192.168.1.81:9300", "attributes" : { "ml.machine_memory" : "3137888256", "ml.max_open_jobs" : "20", "xpack.installed" : "true", "ml.enabled" : "true" } },Once some the controller and the node are up and running, trial the clump with the command:
curl -XGET '192.168.1.80:9200/_cluster/health?pretty'Make definite to edit the IP code to lucifer the IP code of the instrumentality you're moving the bid on. The output should include:
{ "cluster_name" : "monkeypantz", "status" : "green", "timed_out" : false, "number_of_nodes" : 2, "number_of_data_nodes" : 2, "active_primary_shards" : 0, "active_shards" : 0, "relocating_shards" : 0, "initializing_shards" : 0, "unassigned_shards" : 0, "delayed_unassigned_shards" : 0, "number_of_pending_tasks" : 0, "number_of_in_flight_fetch" : 0, "task_max_waiting_in_queue_millis" : 0, "active_shards_percent_as_number" : 100.0 }The important lines to enactment are:
"status" : "green", "timed_out" : false, "number_of_nodes" : 2, "number_of_data_nodes" : 2,You tin besides cheque nodes from the controller with the bid (run connected the controller):
curl -XGET '192.168.1.81:9200/_nodes/?prettyMake definite to substitute the supra IP code for that of your Elasticsearch node. You tin besides constituent a browser to http://SERVER:9200 (Where SERVER is the IP code of your controller) and you should spot output akin to that successful Figure A.
Figure A
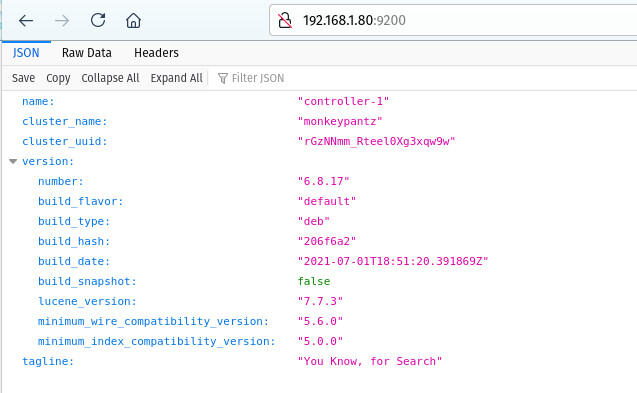
The Elasticsearch clump is up and running.
Congratulations, you present person an Elasticsearch clump up and moving and acceptable for your developers to usage for information visualization.

Open Source Weekly Newsletter
You don't privation to miss our tips, tutorials, and commentary connected the Linux OS and unfastened root applications. Delivered Tuesdays
Sign up todayAlso see
- NVIDIA: Data centers are getting smarter, but besides get little analyzable acknowledgment to intelligent networking hardware (TechRepublic)
- 9 web commands each Linux admin should know (TechRepublic)
- How to go a developer: A cheat sheet (TechRepublic)
- Kubernetes: A cheat expanse (free PDF)(TechRepublic)
- Could Microsoft beryllium en way to dumping Windows successful favour of Linux? (TechRepublic)
- A usher to The Open Source Index and GitHub projects checklist (TechRepublic Premium)
- How unfastened source-software transformed the concern world (ZDNet)
- Linux, Android, and much unfastened root tech coverage (TechRepublic connected Flipboard)


 English (US) ·